Sunday, August 29, 2010

France - Croissants


Background
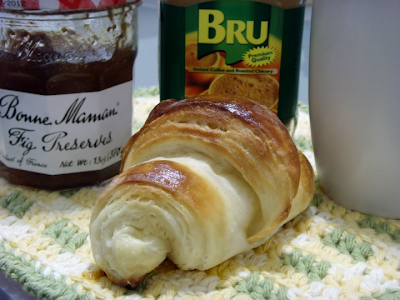
Clearly France is a country whose culinary credentials require no introduction. This reputation left us quite surprised when we realized that breakfast was simply bread, jam, and maybe a soft-boiled egg. The two best known bread products of France are the baguette and the croissant. The home recipes we found for the baguette were pretty simple, but as baguette is not really the same without a real baker's oven, we decided to attempt the croissants. A French friend recommended the Bonne Maman preserves, which are available in supermarkets. Our breakfast guest Stacy brought the French-influenced chicory coffee.
For our recipe source we chose Paris Boulangeries-Patisserie by Linda Dannenberg. This book gives the recipes from her favorite bakers all across Paris. The croissant recipe comes from Marcel Haupis, whose shop is on Ile-St-Louis in the middle of the Seine River. My first impression of the recipe was that is was very scary. In total it involves 6+ hours of rising and an intimidating amount of butter. We recommend starting the night before, so you don't have to get up at 3 AM.

Croissants
  • 2 tbsp + 1 tsp of yeast
  • 1/3 cup warm water
  • 3 1/2 cups flour + 1/2 cup corn starch (or 4 cups cake flour, which we didn't have)
  • 1/4 cup sugar
  • 1 tbsp salt
  • 1 cup milk
  • 2 sticks of butter (barely malleable)
  • 1 egg, beaten
Note: This process is long and involved. Read through the entire recipes and make sure you plan ahead. We have included many photos of the process to better illustrate the process.
Combine yeast and warm water. Let it sit for 5 minutes while the yeast activates.
Mix all the remaining ingredients except the egg with a wooden spoon.
Then mix using an electric mixer and a dough hook until you can form it into a ball. Err on the side of under-working the dough.
Knead the dough on a lightly floured surface until the dough is smooth but still soft.
Work the dough into a ball.
Place the dough in a greased bowl and let it rise for 1 hour. Then refrigerate the dough for 30 minutes.
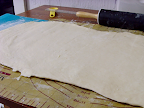
Roll out the dough until it is 9 x 15 inches and 3/8 inch thick and let  rest for 5 minutes.
As the dough is rising take two sticks of butter out to soften.
Put the butter on a piece of wax paper.
The butter should malleable but not too soft.
Work the butter in a square that is 5 x 7 inches and 1/2 inch thick.
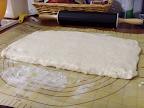
Place the butter on the bottom third of the dough.
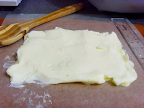
Fold the top third of dough over the middle third and then fold this over the bottom third like a business letter.
Seal the edges of the dough.
Roll out the dough lengthwise until it is 9x16 inches.
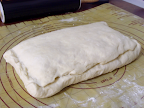
Repeat the folding process and refrigerate the dough for 10 minutes. This completes the second fold.
Repeat this process for a third fold, refrigerate again for 10 minutes.
After a fourth fold, seal the edges dust the surface with flour.
Wrap in plastic and refrigerate over night.
(This folding process creates layers of butter that help to create the pockets and flakes in the croissant. See if you can calculate how many layers of butter this will create.)
The next morning unwrap the dough and let it rest for a few minutes at room temperature.
Roll the dough into a rectangle 12 x 30 inches.
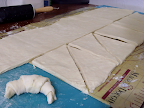
Cut the dough down the middle using a chef's knife.
Square off the edges of the two strips and cut the strips into 5 x 6 inch rectangles.
Then cut along the diagonal starting in the bottom corner and moving up.
Starting at the 5 inch side of the triangle, roll the dough into the appropriate shape with the tip of triangle coming into the middle.
Shape it into a crescent and place onto a dampened cookie sheet. Make sure the tip is under the croissant to keep it from unfolding during baking.
Brush with the egg and let rise for 2 more hours.
20 minutes before you put the croissants in the oven pre-heat it to 400 F.
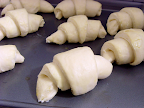
Put on a final brush of eggs and place in the oven for 10 minutes.
Monitor them as they cook and take them out if they start to burn.
Results
These turned out really well. Really, really well. They smelled great as they cooked and the smell lingered for a long time. They were warm, soft, flaky, and tasted great with the fig preserves. They oozed butter as they cooked so we highly recommend a baking tray with edges.
It felt really awesome that these work. After completing this meal I want to try to bake more things. The book we got this recipes from has lots of other challenges that look great and I want to try.
We should also say that this recipe produces lots croissants. You should bring the leftovers to work to show how much cooler you are because you made croissants from scratch.

The answer is 27.

Saturday, August 21, 2010

Thailand - Kao Tome

Note: Yes, we disappeared last week. We did cook breakfast; scroll down to see that post as well.


Background
This week's menu had two excellent sources. A friend from Thailand gave us lots of recommendations. Her first recommendation was pah-tong-goh which is a version of donuts. I found some good recipes and many different spellings of this dish. The logistics of the day meant we did not have enough time to make them. It also seems to be a street food so it may not be something that Thai people make at home. Either way, I want to make this at some point in the future.
The other recommendation she made was kao tome which is a rice porridge. I was hesitant to try rice porridge again given how the cháo bò turned out. I started looking for recipes because it would provide a chance to compare the different approaches to the same dish. I came across the book Real Thai by Nancie McDermott which had a recipe that looked good. According to McDermott, Thai cuisine reflects its geography as it rests between Indian and Chinese cuisine.

Chili-Vinegar Sauce (Prik Dong Nahm Som)
Combine the following ingredients the night before and refrigerate.
  • 1/2 cup white vinegar
  • 1 tbsp fish sauce
  • 10 hot chilis thinly sliced crosswise

Fried Garlic (Gratiem Jiow)
Make the night before
  • 1/4 vegetable oil
  • 2 tbsp minced garlic
Important Note: This entire process should not take more than 3 minutes. Otherwise you will burn the garlic as I have done in the past.  Also do not use canned pre-minced garlic as the high moisture content will affect the results.
  1. Heat oil in a skillet over low heat.
  2. Test the oil by dropping in a piece of garlic. The oil is ready if it sizzles immediately.
  3. Add the rest of the garlic and cook until it starts to turn golden.
  4. When the color change starts remove the garlic from heat.
  5. The garlic will finish cooking in the hot oil.

Kao Tome
  • 4 cups chicken stock
  • 2 cups of cooked jasmine rice
  • 1/4 lb minced pork
  • 1 tbsp fish sauce
  • 1/4 cup fried garlic
  • 3 tbsp green onion cross sliced
  • 1 handful of cilantro
  • Chili-Vinegar Sauce
  1. Bring stock to a boil and stir in the rice.
  2. When the water starts to boil, add the minced pork and cook until the pork is done, about 5 minutes
  3. Stir in fish sauce and pepper.
  4. Remove from heat.
  5. Garnish with fried garlic, green onion, chili-vinegar sauce, and cilantro leaves.
  6. Add chili-vinegar sauce and fish sauce to taste.

Results and Discussion
Thai rice porridge was better than our Vietnamese rice porridge. The first major improvement was making the rice the night before and cutting an hour off the prep time. This version also had a much better taste and was lighter because we had a leaner meat. The chili-vinegar adds a nice accent that brings out the other flavors in the meal. The fried garlic is a nice enhancer as it gives little crispness at a couple of points. If I were to retry the cháo bò I would cook the rice the night before and start from there and save a lot of time. I also have lots of leftover chili vinegar sauce and I will have to find a way to use it up. I could see it working as a salad dressing with a couple of additions.

Sunday, August 15, 2010

Iran - Khiyar with Kateh


Background
Information on Iranian breakfast was much easier to find than last week's country. The books Treasury of Persian Cuisine and A Taste of Persia provided excellent information and a variety of choices.
Archeology of Persian cooking goes back to 2000 BCE and a cookbook from the 1200s is known to exist. The 13th century cookbook focuses on combinations of sweet tasting meets with different syrups and fruits. Rice is mentioned in this text but it is not yet given any special attention. Treasury of Persian Cuisine provides an interesting aside on how Persian cuisine in the 17th century was based around balancing the humors with foods that fall into the categories of hot, cold, wet, and dry. Hot and cold foods refer to the food's energy content. The book did not mention what was meant by wet and dry.
Our options for this meal were plentiful. One was a soup with bulgur wheat and lamb called haleem, and it is served during Ramadan which has just started.  But it also takes 2-3 hours to make. The next entree I came across was khiyar which is cucumbers with feta or honey that is eaten during the spring. We have some nice cucumbers from our farm share so we decided to make this.
For our carb we had to choose between nan-e barbari and kateh. Nan-e barbari is a baked flat bread. Kateh is a rice dish where the rice is baked into a cake shape. The bread is traditionally eaten with the khiyar, but I chose the kateh because we have had flatbreads with previous breakfasts and this dish was a new challenge.

Kateh
  • 2 cups jasmine rice
  • 3 1/2 cups water
  • 2 tsp salt
  • 1/3 cup ghee
  1. Wash the rice.
  2. Combine water, rice, and salt and bring it to a boil on high heat.
  3. Simmer on medium until all the water absorbed and stir to prevent rice from sticking.
  4. Stir in ghee
  5. Cover pan with a paper towel to absorb condensation and place the lid on top to secure it.
  6. Cook for 30 minutes at low heat.
  7. Invert rice onto a platter and serve as a golden cake
Khiyar
  • Sliced cucumber with feta crumbled on top drizzled in honey

Results and Discussion
The khiyar was simple, quick, and tasty. The flavors go together really well and are nice on a warm summer morning. The cucumbers were very moist and this goes well with the dryness of the feta. The honey's sweetness compliments the feta's salty taste.
The kateh could have come out better. The basic taste was very simple and nice. (Ghee makes things taste good.) The major issue in preparation was probably not getting the ghee distributed evenly into the pan and along the sides. As a result the golden brown shell was left on the side of the pan. Looking online I found advice that I should use a non-stick pan. Follow this advice. I also think that melting the ghee before mixing it into the rice would also help to ensure a better distribution and hopefully lead to less sticking.

Sunday, August 8, 2010

Democratic Republic of the Congo - Saka-Saka


Background
The background research for this breakfast was very difficult but had an elegant solution in the end. Cookbooks about the Democratic Republic of Congo or Zaire were not easily found. The next step on our search was to find cuisine of the dominant ethnic group of the country. This ethnic group is the Bantu and they are widespread through out sub-Saharan Africa. As a result I found a very comprehensive site about Somali Bantu which I stashed away for future reference.
The elegant solution came via my mother who reminded me that a good friend had lived near the DRC border studying gorillas for a year. I phoned Ayres and he recommended saka-saka. The recipe is from an African recipe site called The Congo Cookbook. I had come a across it before but I was unaware it was eaten for breakfast. In Africa the leaf would be a cassava leaf and would freshly picked form the plant. We chose to use collard greens as recommended by the website. We served the saka-saka on jasmine rice.

Saka-Saka
  • 1 bunch of collard greens
  • 2 tbsp peanut oil
  • 1 onion chopped
  • 1 clove garlic minced
  • 1 bell pepper chopped
  • 1/2 lb chopped okra
  • can of sardines
  • salt to taste

  1. Tear the leaves into pieces and throw out the stemmy parts of the leaf.
  2. Soften the leaves with a rolling pin.
  3. Bring 4 cups of water to a boil, add the leaves, and simmer for 30 minutes uncovered.
  4. Add the remaining ingredients to the pot and cook down the water.
  5. Serve on a bed of jasmine rice.
Results and Discussion
This breakfast was simple once the research was done. The major mistake we made was buying a fresh packing of sardines. They had very little salt in them and so the final dish was a little bland. This problem was quickly remedied with a salt shaker. Another problem that I added far to much water at the beginning and it took a long time to cook off. The 4 cups given in the recipe is my guess at what should be an appropriate amount of water to cook the greens and have the breakfast ready in a timely fashion.
An alternative method of mashing the leaves involves a bowl, a bottle, and bashing. We chose the rolling pin method because we live in an apartment and bashing the leaves early in the morning would be rude to the neighbors. It does sound much more fun than a rolling so somebody try it and let us know.