Friday, December 24, 2010

Algeria - Chakchouka


Background
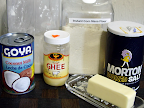
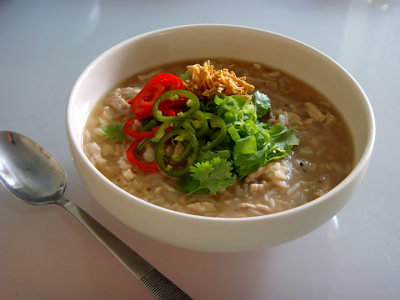
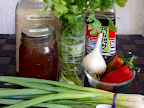
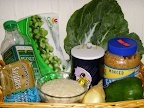
I was only able to find two dishes in my search for Algerian breakfast. The first meal I found was makrout, which is a fried cookie made with semolina flour and flavored with almonds or dates. This week was our first time taking the IBP on the road and we were unsure how our host was equipped deep frying, so we went in another direction. We settled on making chakchouka which consists of peppers and onions in a tomato sauce and then poaching eggs in the sauce. The chakchouka is then eaten with either a local flat bread or a baguette. The recipe we used was from a very comprehensive cookbook of vegetarian cuisine from the Mediterranean called Mediterranean Harvest. It has over 500 recipes and seems pretty well written from what I have read of it. We went with a purchased baguette for simplicity, and we substituted poblano peppers for the recommended anaheims because we could not find them.
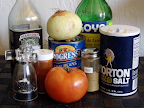
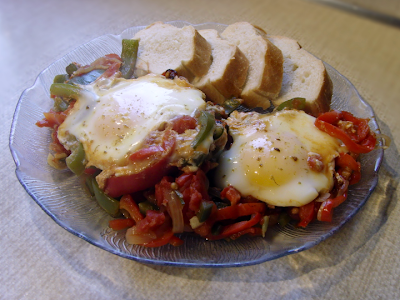
Chakchouka
  • 2 tbsp extra virgin olive oil
  • 1 large onion, sliced thin
  • 2 green peppers, sliced
  • 2 red peppers, sliced
  • 2 poblano peppers, diced
  • 4 cloves of garlic, minced
  • 2 tsp of harissa (we used more)
  • 1 tsp tabil (recipe follows)
  • 1 (28oz) can diced tomatoes, drained
  • ¼ cup chopped parsley (optional)
  • 4 eggs
  1. Heat oil in pan and add the onions.  Cook until golden, about 10 minutes.
  2. Add the peppers and cook until they are soft, about 5 minutes.
  3. Add the garlic and cook until fragrant (just a few seconds), then stir in harissa, tabil, and salt & pepper to taste.
  4. Add the tomatoes and cook until thickened.
  5. Add most of the parsley, reserving some to add with the eggs.
  6. Use a spoon a make 4 depressions into sauce, and crack an egg into each depression.  Cover the pan with a lid or tin foil if a lid is not available.
  7. The eggs will poach in about 5 to 6 minutes and they should still have runny yolks.
  8. Flavor the eggs with harisa, tabil, parsley, and salt & pepper to taste.
  9. Eat with baguette or flatbread.
Tabil
  • 4 tbsp coriander seeds
  • 1 tbsp caraway seeds
  • 2 tsp garlic salt
  • 2 tsp cayenne pepper
  1. Grind whole seeds using a spice mill.
  2. Mix this with the garlic salt and cayenne pepper and keep in a jar. (It makes enough to fit in an average spice jar.)
Results and Discussion
This meal was a big success. It comes out as a very flavorful and spicy tomato sauce with eggs in it. I added a couple more teaspoons of harissa to make it spicier and this was really nice. The baguette soaks up the juices really well and quickly takes on the chakchouka flavor. The cookbook mentions making the sauce a day or so before hand and adding the eggs before serving to let flavor mingle. I will use this as a pasta sauce in the future.

Sunday, December 19, 2010

Poland - Cold Cuts, Cheese, and Borscht


Background
Looking for information on Polish breakfast one quickly finds it is pretty low-key and does not involve much cooking. I found a few sites mentioning little breakfast cakes, and one reference to cottage cheese pancakes. The vast majority of information said bread with cold cuts or sausage along with a farmer's cheese called twaróg. I decided to use a native resource and asked a Polish friend at work. Piotr confirmed what I read online and recommended lean ham (szynka) and Hungarian salami (węgierska salami) for the cold cuts. For bread he told me to get rye bread with a thick crust. He also recommended a spread called smalec which is rendered bacon fat with bacon in it. He also said we would probably not be able to find it.
Since all of the components of this breakfast need to be store-bought, we took the subway to the Baltic European Deli in Dorchester. We were able to get everything we needed including the smalec, which came in a pint-sized tub.
On the morning of the breakfast Piotr brought over some instant packets of barszcz (borscht), which is drunk at breakfast during the Christmas season.

Results and Discussion
This breakfast was a great success and comes together quickly once the water has boiled. The smalec spreads very smoothly and the bacon gives it a very nice flavor. The cold cut on top gives the bread a bit more substance. The twarog was a nice smooth texture but is a little bland on its own. When combined with the saltiness of the ham and salami it becomes much better, though this is not strictly traditional.
The barszcz had a deep savory flavor and tasted pretty good for an instant version of the soup. I would to try and make a proper version some time because it would nice to have a cup after coming in from the cold.

Monday, December 13, 2010

Kenya - Maandazi and Chai


Background
Like most East African countries, Kenya's cuisine is a product of migrating tribes, exchange with Arab nations via the spice trade, and European colonial powers. English rule brought the influence of Indian servants.
Kenyan breakfast has several major staples. The first is ugali, which we made for Tanzania (and, according to our new cookbook, is meant to be bland and take on the flavor of accompanying dishes). Another option was uji, which is a porridge made from millet. We decided to go with maandazi which is fried dough flavored with cardamom and cinnamon. They are usually accompanied by the local version of chai.
Our book for this breakfast was Foods of Kenya from the series A Taste of Culture. It is a very thin book, written for schoolchildren. It gives a succinct overview of the cuisine framed in terms of major ingredients and when they are eaten. This book does not have a lot of recipes but it includes the cultural and contextual uses of the foods in more detail. We will probably consider using children's cookbooks again in the future based on the usefulness of this little book.

Maandazi (24 pieces)
  • 2 cups flour
  • 2 tsp baking powder
  • 2/3 cup sugar
  • 1 tsp cinnamon
  • 2 cardamom seed pods, shelled and ground
  • pinch of salt
  • 1 beaten egg
  • ½ cup milk
  • 2 tbsp melted butter
  • oil
  1. Mix flour, sugar, baking powder, cinnamon, cardamom, and salt.
  2. Mix egg, milk, and butter in a separate bowl.
  3. Slowly add the wet ingredients to the flour while mixing.
  4. Knead the dough until it is smooth. Slowly add more flour if the dough is too sticky.
  5. Cover the dough in a bowl and let it rest for 30 minutes.
  6. Roll the dough out on a floured surface until it is at most ½ inch thick.
  7. Cut the dough into small triangles or squares as you desire.
  8. Heat the oil in a medium pan on medium.
  9. When the oil is hot add the dough and fry until it is golden. Then flip and cook the other side.
  10. Place of a paper towel lined plate to drain.

Chai
  • 1 cup water
  • 2 cups milk
  • 4 tsp black tea
  • 8 tsp sugar or to taste
  • 1/2 cinnamon stick
  • 2 cardamom pods
  1. Bring the water to a boil, then stir in remaining ingredients.
  2. Reduce heat to medium, and return mixture to the boil.
  3. Turn off heat and let steep to desired strength.  Strain before serving.

Results and Discussion
These were really good doughnuts—a nice crispy outside with a moist inside. The cardamom was a really good flavor. It was subtle but it added to the taste and aroma. Dipping them into the chai lets you increase the sweetness as desired.
One problem we encountered was an occasionally uncooked middle. I think this problem came from the dough being too thick. In the future I would treat the ½ inch thickness as an upper limit and go with ¼ inch in the future. Rolling the dough thinner would also give a larger yield. I think I cut the piece too large as I got only half of the anticipated 24 pastries.
The book recommends eating them hot, and as a fan of Krispy Kreme I cannot argue with this approach to the doughnut family, but these are just as tasty cold and would make a great dessert.

Sunday, December 5, 2010

Spain - Magdalenas


Background
Spain is known for its highly regional cuisine, and many books have been written extolling the virtues and depth of this regional specificity. A quick internet search finds that the Spanish have very small breakfasts usually consisting of some bread and coffee. While the idea of bread and coffee is constant, the form of bread is varied. I was able to find three common types. Churros are fried dough sprinkled with sugar. They required deep frying, so we decided to look for other options. Torrijas is a bread pudding flavored with sugar and cinnamon, but we were unable to track down a recipe in a cookbook. Sobao is a muffin eaten in the north of Spain that was recommended to us by a lovely Spanish couple we met on Thanksgiving. Unfortunately, we were also unable to find a recipe. In the end we decided on another form of muffins called magdalenas. We found a recipe in The New Spanish Table which the author attributes to a master baker named Xavier Canal in Barcelona. We served the magdalenas with with cafe con leche.

Orange and Pistachio Magdalenas
  • 1 cup cake flour
    (¾ cup + 2 tbsp all purpose flour + 2 tbsp cornstarch)
  • ½ cup all purpose flour
  • pinch of salt
  • ¾ tbsp baking soda
  • 3 eggs at room temperature
  • 1 1/3 cup confectionery sugar
  • 1/3 cup whipping cream
  • ¼ cup orange juice
  • ½ cup light olive oil
  • 1/3 cup lightly toasted pistachios
  • 1 tbsp orange zest
  • butter, at room temperature (for greasing the tin)
  1. Mix flours, salt, and baking soda and set aside.
  2. Beat eggs with an electric mixer until they are fluffy, about one minute.
  3. Add the confectionery sugar and beat the mixture at high speeds until the mixture is yellow and the volume has tripled, about 5 minutes.
  4. Mix olive oil, orange juice, and cream.
  5. Add 1/3 of the flour mixture followed by 1/3 of the oil mixture.  Repeat until they are depleted.
  6. Stir in the orange zest and pistachios.
  7. Cover the mixture and let it sit at room temperature for 30 minutes.
  8. Meanwhile grease the mini-muffin tins with butter and preheat the oven to 375°F.
  9. Fill the muffin tins almost to the brim.
  10. Bake in the center rack for 20 to 23 minutes switching their positions after 10 minutes.  Pay very close attention to them towards the end as they can dry out quickly.
  11. Let them cool for 15 to 20 minutes and then sprinkle with confectionery sugar.

Results and Discussion
This breakfast was easy and tasty. Most of the time was spent waiting for baking and cooling. The magdalenas have a nice crispy exterior and a moist cakey interior. The pistachios and orange flavoring add a great flavor profile and makes them taste very refreshing. These would make a part of a larger breakfast as muffins.
I also understand why the Spanish have a large lunch.  We spent the day out Christmas shopping and both got really hungry around 3 o'clock. Carbs and coffee only go so far when you spend all day walking.

Sunday, November 28, 2010

Argentina - Medialunas and Yerba Mate


Background
Argentine cuisine is a blend of French, Spanish, Italian, and Andean influences. This split of European and native influences is found in the differences between the cities and rural areas.
I found lots of information on Argentine cuisine is and its regional variations. All of the books basically mention breakfast as “minimal,” which I interpret as very simple. Looking online I learned that breakfast is either bread covered with dulce de leche, or medialunas, a croissant-shaped pastry. I chose to make medialunas because I wanted to try a variation on the croissant.  The drink is either cafe con leche or a tea made from the leaves of the yerba mate plant called mate. Yerba mate is traditionally served from a hollowed gourd, which we conveniently had in the apartment.

Recipe
For this weeks recipe we refer you to the blog of an American ex-patriate living in Necochea, Argentina, who did a wonderful job describing the process. I had to make a substitution for the yeast. Her recipe uses 0.9 oz of fresh yeast which expires quickly because the yeast is active when purchased. We do not bake enough to keep this on hand so I used a substitution of 1½ packages of active dry yeast. Another issue created by this substitution is the need of warm water to activate the yeast. I heated up the milk used in the recipe to serve this purpose. We also chose to put the vanilla extract in the glaze and not in the dough.

Yerba Mate Video


Results and Discussion
The medialunas came out great despite some reservations about the dough I will discuss later. They smelled fantastic while baking and bled butter as they puffed and browned. The vanilla sugar glaze added a nice texture and sweetness. While they were flaky on the outside, the inside felt meatier and solid—a nice contrast.
I was not a fan of the yerba mate. It was bitter and very overpowering. The taste changed with each sip as continued to steep and preferred the earlier sips to the later ones. In the second brewing of the leaves the bitterness was greatly reduced but still pretty strong. Some people add sugar to help with this problem but we were drinking it out of a gourd my mother-in-law gave my wife after her trip to Argentina and putting sugar into these is ill-advised. I should also mention that the bombilla conducts heat so sip carefully if it has been sitting in the water for a long time.
I was initially concerned because the dough was very dry. I checked this against the croissant recipe we used for France and based on the ratios the dryness seemed reasonable. With a dryer dough, cold rising, and my impatience to let the dough get up to room temperature, working the dough was difficult.  Kitty came up with a good solution to this on the final turn and I wrapped the dough in a damp warm rag for 10 minutes. Letting the dough rest for an hour outside the fridge in the morning reduced this problem.
I was also nagged by a feeling that the yeast had not fully activated and that this inhibited the rising. I saw the yeast bubbling in the milk before I added it to the mixture so I know it activated.
I would also like to compare the writing of the recipe in this breakfast to the French croissant. This recipe was much more free form in its approach giving the essential guidelines but allowing the cook to shape and size the final item. The French recipe was much more highly detailed with exact dimensions and more information about resting times and other details. It was a gift to a cook trying something intimidating for the first time. The medialunas recipe was great for a second pass at this type of pastry because more awareness of basic techniques are placed on the cook. It demonstrates the importance of understanding why something is done versus following instructions.

Sunday, November 21, 2010

Tanzania - Ugali and Chapati


Background
Tanzania was founded in 1964 when the states of Tanganyika and Zanzibar merged. Zanzibar consisted of two islands off the eastern coast and Tanganyika was on the mainland. Zanzibar has a history as a trading port which gave it contact with cultures from all over the Indian Ocean. Its major assets were spices and slaves. Zanzibar's cuisine is based around rice, and coconut and seems very similar to Indian food. The mainland diet is based around bean, cassava, and corn which is closer to its neighbors.
I was surprised when I came across Tanzania Traditional Cookery in the library. It is basically a pamphlet bound in card-stock. The pages are inconsistently photocopied and the table of contents is only a rough guide on where to find the recipes. It also provided an entire section of breakfast food. Upon further examination all of the meals were listed under breakfast. This made me doubt the credibility of the categories given.
The second book we found was Tanzania Cookbook which had a far more credible table of contents. It fails to provide any information about when the dishes are usually served or the cultural heritage of the dishes. What makes this even stranger is that the blurb on the back of the book says that the book is for educational purposes. One of the major annoyances I have encountered in this project is books that purport to extol the virtues of a country's cuisine but give no cultural context about the dishes.
Given the absence of contextual and cultural information I went to the Internet. The Tanzanian Embassy webpage provided us with contextual information and a list of breakfast dishes. Once we had a list of dishes the cookbooks became useful.
We decided to go with ugali and chapatis served with chai tea. Ugali is a corn porridge that was compared to polenta in many recipes that I read. The chapatis use coconut milk which is different from past recipes.

Coconut Chapatis
  • 8 oz flour
  • ½ cup coconut milk
  • 1½ oz ghee or oil
  • ¼ tsp salt
  1. Mix flour and salt in a bowl.
  2. Add coconut milk and mix until it is doughy. Slowly add more coconut milk if required.
  3. Add ½ tablespoon of ghee to the dough and knead until it is smooth.
  4. Divide the dough into 6 evenly sized balls.
  5. Roll out a ball into a large flat circle.
  6. Cover circle with ½ tsp of ghee/oil.
  7. Make a slit along the radius of the dough and roll it into a cone.
  8. Seal the edges of the cone and squash it flat.
  9. Let them rest for 20 minutes.
  10. Heat a non-stick pan.
  11. Roll out the dough flat until it is about 1//8 of an inch thick.
  12. Melt some ghee in the pan put the flattened dough into the heated pan.
  13. As the uncooked side starts to puff spread some ghee and flip it.

Ugali
  • 120 g fine corn meal
  • ½ cup milk
  • ½ cup water
  • ½ tbsp butter (optional)
  • salt (optional)
  1. Make a paste with the corn meal and milk.
  2. Bring the water to a boil, add the butter and salt.
  3. Stir in paste and then add the remaining maize flour.
  4. Continue to stir until it becomes stiff.
  5. Serve on top of warm chapatis.

Results and Discussion
The coconut milk in the chapatis gave the dough a much softer texture than previous recipes we had used. The layering technique used in making them gave them a flaky texture and the oil kept them very soft.
The ugali was very simple and a little bland. We also think it might have been under done. We halved the recipe from the one given in the cookbook and quantity of water and milk may have been too small to properly cook it. Another problem might have been our choice of corn meal. The recipe called for maize flour which according to my research is corn meal. Many recipes for ugali compare it to polenta for its texture. Fine corn flour may be too fine for our needs and using polenta might be a better substitute in the future.

Sunday, November 14, 2010

Sudan - Fool Medamas


Background
The history of Sudan is closely linked to Egypt's. Both countries have conquered one another and both were under British and Ottoman rule. I had difficulty finding a published source on the Sudan and in the end I decided to use the web site Sudan.net. This site listed fool medamas and tamayya as possible breakfasts. We made fool medamas as our breakfast for Egypt, though we spelled it differently. Tamayya is another word for falafel and it is eaten at any time of the day.
After we made our Egyptian breakfast I ran across an article in the paper listing the best dishes in Boston. One of these dishes was the fool medamas from Falafel Palace. We were not very thrilled with our recipe so I wanted to try a much different version. Falafel Palace makes a great version more like a bean salad with fresh vegetables and a yogurt dressing. It made a great light lunch and is really cheap. The new recipe is very different than the one we used for Egypt so I decided we should do a comparison.

Fool Medamas
  • 1 (16 oz) can of fava beans
  • 1 large onion, chopped
  • 1 large tomato, diced
  • 1½ tbsp olive oil
  • 1 tsp ground cumin
  • ¼ cup chopped parsley,
  • 4 tbsp lemon juice
  • salt, pepper, and chili powder to taste
  • pita bread
  1. Pour fava beans and juice into a sauce pan and bring them to a boil.
  2. Mix all other ingredients—except lemon juice—in a bowl.
  3. When the bean juice has almost evaporated add the remaining ingredients to the pot along with the lemon juice.
  4. Cook uncovered for about 5 minutes, until most of the water is gone but the mixture is not dry.
  5. Eat with pita bread along with hard boiled eggs and tahini.
Results and Discussion
This recipes was much better than the one we used for Egypt. The first major improvement was the inclusion of spices so that I actually tasted something. Not mashing the fava beans was also key. When the beans are mashed they suck up all the moisture and the result is a very dry paste with some vegetables mixed into it. Not mashing the beans keeps the fool medamas moist and much more palatable.

Sunday, November 7, 2010

Colombia - Arepas de Queso


Background
Finding the dishes for this meal was very easy. I sent an email to a Colombian friend from high school and Javier promptly got back to me with several options and a reminder that Colombia also has coffee. Javier's list of recommendations was arepas, pan de bono, and bunuelos.
Bunuelos are deep fried fritters that looks a lot like doughnut holes. According to Wikipedia they most likely originated from Sephardic Jews or Arabs and are popular through out the Mediterranean and former Spanish colonies. We decided against these because we are reluctant to deep fry on a gas stove.
Pan de bono is a bread made of corn flour, cassava, cheese, and eggs. It is sometimes bagel-shaped and other times in little puff balls. Preparation is not difficult, but we decided to give the arepas a try because we like farmer's cheese and our cookbook, Secrets of Colombian Cooking, had many different varieties of arepas.
We made two kinds of arepas. The first was arepas de choclo and the second was arepas de queso. We will get to why we cooked two arepas in the discussion.

Arepas de Choclo
  • 1 cup plus 2 tbsp cut corn
  • 8 oz white farmer's cheese
  • 1½ tbsp melado
  • 1 tsp sugar
  • 1/8 tsp salt
  • oil or butter
  1. Put the corn in a food processor and chop for one minute.
  2. Grate a little less than 4 oz of the cheese.
  3. Mix corn, sugar, salt, melado and cheese.
  4. Cover a small non-stick skillet with oil or butter and place over medium heat.
  5. Place ½ cup of the mixture on the hot pan, flattening it out a little bit.
  6. Cook for 4 minutes.
  7. Flip it on a plate and cook the opposite side for 4 minutes.
  8. Serve with butter on the side and slices of the remaining cheese.

Melado
  • ¼ lb grated panela
  • ¾ cup water
  • 1 cinnamon stick
  1. Combine panela, cinnamon, and water.
  2. Simmer mixture until the panela dissolves completely.
  3. Boil for 5 minutes and allow the syrup to thicken.

Arepas de Queso
  • 1/3 cup instant masa
  • 1/3 cup warm water
  • 2 tsp soft butter
  • ½ tsp salt
  • ¼ lb grated farmer's cheese
  • oil or butter for cooking
  1. Mix cornmeal, water, butter, and salt for 30 seconds by hand until it has a pasty consistency. Let it stand for 5 minutes.
  2. Knead this mixture with your hands for a minute until it feels doughy.
  3. Add the grated cheese to the dough and knead again.
  4. Divide the dough into 4 balls.
  5. Shape the balls into little patties about ½ in thick.
  6. Melt a knob of butter into a frying pan over medium heat.
  7. Cook the Arepas on both sides for 2 minutes until they are a golden color.
  8. Serve with melado.

Results and Discussion
We had an extra hour this morning because of the time shift and we really needed it. The first mistake was trying to make the melado and not adding the water. This gives a very bad result and should be avoided if at all possible.
When we made the Arepas de Choclo they fell apart and stuck to the pan when we flipped them. I think the problem had a few possible causes. The one I suspect most was our failure to add enough oil. The recipe just called for a light coating but given the low amount of butter the author called on the arepas de queso I think she is stingy with the oil. Another problem might have been increased water content because we used frozen corn. I could have also failed to get the heat on the pan right. Whatever the cause they fell apart when we tried to flip them and the results looked like badly botched omelet. We snacked on them while making the arepas de queso and they were nothing really special.
The arepas de queso were very successful. I was initially worried about the ratio of cheese to masa but it worked very nicely. The outsides were crisp and cheese was well melted. The salt called for in the recipe was unneeded because the saltiness of the cheese. Dipping it in the melado cuts the salt and adds a very nice subtle sweetness. The author recommends making these as appetizers for parties and I would agree with her. I would just use much more oil or butter than she recommends.

Sunday, October 31, 2010

Ukraine - Kasha Porridge


Background
We had lots of good resources for Ukrainian cuisine. The first source was a friend who grew up in the Ukraine (and also introduced the two of us). She recommended buckwheat kasha porridge and a blintz as very traditional.

With our meal set up, I went looking for recipes. Ukrainian cookbooks were very easy to find. We got Please to the Table, which we used for Russia. It had no recipe for kasha porridge. Next we checked out The Best of Ukrainian Cuisine and also found no porridge recipe. The next book I found was Ukrainian Cuisine and this one was very interesting. First it was from Julia Child's cookbook collection which is pretty cool. The book itself was written in the USSR in the 1970s and translated a couple of years later. I am not sure if it is the translation or the actual tone of the book but this was easily the most authoritarian cookbook I have ever read. It spent a great deal of time focusing on how to space your meal throughout the day, declaring how many canned products are more readily available than in the past and frequently citing the works of Pavlov on appetite stimulation. Here are some quotes from the book: “regular meals at fixed times establish a proper pattern of reflexes” and “to arouse the appetite and ensure that meal are thoroughly enjoyed the important thing is eating at regular hours.” This book contained no kasha porridge recipes either, but it had lots of uses for tripe and lungs if you are looking for recipes.

Please to the Table provides some wonderful context about the importance of kasha in eastern Europe. Six hundred years ago kasha simply meant feast. It has a place in rituals such as funerals and weddings. The book also lists many different expressions involving kasha such as “he's got kasha in his head” (he's mixed up) and “you can't make kasha with him” (you will get nowhere with him).
We bought our kasha from the Russian Village market, which according to the internet is actually owned by a Ukrainian.  The brand pictured has English directions on the packet, which we followed—the recipe apparently too simple to merit inclusion in cookbooks. We also had a very nice Russian tea blend from the same shop.

Basic Kasha Porridge
  • 1 cup kasha
  • 2 cups water
  • 1 tsp salt
  1. Combine all ingredients in a sauce pan and bring to a boil.
  2. Simmer for 15 to 20 minutes, stirring occasionally, adding add more water if needed.
  3. Serve with milk and sweetener in amounts of your preference.

Results and Discussion
This breakfast was very simple in every sense. The dish that it seems most appropriate to compare this one to is oatmeal (actually I think it's more like Wheatena –Kitty). The roasted seeds give a subtle smokey flavor. The kasha also feels much more substantive as you chew it and it gives resistance to your bite than oatmeal.

Sunday, October 24, 2010

Burma - Mohinga


Background
Burma (Myanmar) is a large country, around the size of Texas, with 125 ethnic groups. It lies between China and India in southeast Asia. Given the repressive nature of the current military government, I expected finding information on the country to be difficult. I was disappointed. A quick internet search gave lots of results and Wikipedia page on Burmese cuisine was very complete and detailed. While looking for books I quickly found lots of resources.
The three books that were the most useful for both culture and recipes were The Burmese Kitchen, Best of Burmese Cooking, and Cook and Entertain the Burmese Way. Finding what defines traditional Burmese food is rather difficult given that it lies on trade routes between the major culture of India, China, and Thailand. All of these cultures influence Burmese cuisine in some way. Traditional Burmese cuisine is concisely defined as the food in Burma that has not been influenced by it neighbors.
I found three major breakfast dishes. The first is mohinga, which is a fish and noodle soup served by street vendors. Ohhnokaukswe is a chicken and coconut noodle soup in a curry. Kaungnyin paung is traditional farmers dish made of glutinous rice with black eyed peas. Nanpyar is a commonly eaten flat bread, which while mentioned in all of the books it never appear with a recipe except in one book which has it in correctly listed in its index. I chose the mohinga because I like catfish and because it is considered the national dish, but mostly because I like catfish.

Before starting this recipe please be advised that this makes a lot. The recipe below is supposed to give 6 servings but I would estimate it at least 10 portions.

Soup Concentrate
  • 2 lbs of catfish
  • 2 stalks of lemongrass
  • 1 inch fresh ginger
  • ¼ tsp tumeric
  • 1 tsp shrimp paste
  • 1½ tbsp fish sauce
  • 4 dried red chilies
  • 5 cups of water
  1. Break open the ginger to expose the inside.
  2. Cut the lemongrass into smaller pieces to fit in the pot.
  3. Cut you your catfish fillets in half.
  4. Put all the ingredients into a pot, bring to a boil, and simmer for 30 minutes.
  5. Remove the fish from the broth and strain out the solids while retaining the broth.
  6. Remove any bones from the fish if necessary.
  7. While the broth is simmering, prepare the rest of the ingredients below.

Complete Soup
  • ½ cup jasmine rice toasted in a dry skillet, then ground to a powder in a food processor
  • 2 tbsp roasted peanuts, ground (use nut grinder if available)
  • 1½ tbsp semolina
  • 8 oz chickpeas, cooked
  • 2 tbsp peanut oil
  • ¼ tsp tumeric
  • 1 onion, thinly sliced
  • 2 garlic cloves, finely chopped
  • ¼ inch fresh ginger
  • ½ tsp paprika
  • ½ tbsp salt
  • 1½ tbsp fish sauce
  • ½ tbsp sugar
  • 6 peeled shallots (these are substitutes for banana stems)
  • 8 oz of somen noodles
  1. Mix powdered rice, semolina, and peanuts in 1 cup of water. Let it stand for at least 15 minutes.
  2. Mix chickpeas and 1 cup of water in a food processor.
  3. Heat the oil in a pot large enough to contain the final quantity of soup.
  4. Add onions, garlic, ginger, turmeric, and paprika to the oil and cook for two minutes at medium high heat.
  5. Add the fish and cook for another 5 minutes. Stir regularly.
  6. Stir in salt, sugar, and fish sauce.
  7. Add rice/semolina mix and chickpea paste.
  8. Bring to a boil, add shallots, and simmer uncovered at low heat for an hour. Stir regularly.
  9. Once the soup has thickened, cook the somen noodles and add them to the bottom of a bowl, then cover with soup.
  10. Season to taste with lime juice and garnish with scallions.
Results and Discussion
This breakfast look a long time to make. Fortunately we had a dinner of wings and pizza the night before so we were not super hungry. The length of the simmering and the broth making resulted in very deep flavors and this probably better simulated what it would be like to get this from a street vendors who has had their pot going all day. The flavors are very full and as the fish dissolves it gives the soup a porridge-like texture. The lime juice provides a very nice bite. I really gobbled this down. This would be great on cold mornings.
We also used fresh lemongrass in this recipe. When we previously used lemongrass for the Indonesia breakfast we used the dry product and the taste was awful. Using the fresh lemongrass makes a complete difference.
I feel very certain that an equally acceptable version of this could be made in a much shorter time. The initial broth could be made the night before or you could make the paste and thicken it while you are making the broth. Adding less water would also get the job done. Also invite friend over when you make this, because you make a lot!

Saturday, October 16, 2010

South Korea - Soup and Rice, Side Dishes and Kimchi


Before we start, I just want to point out that most of the time I lived in Korea, I ate something like this for breakfast:


However, Corn Flakes are not really in the spirit of the Project. The traditional Korean breakfast is not really different than lunch or dinner. Rice, soup, and kimchi would suffice for a basic meal, and usually all that is hanging around from dinner so its no trouble to put together. Since we try to cook something a little more than the basic meal, we did a few more sides: fried egg, anchovies, kim (nori), and bracken salad. (This makes seven dishes total – there should always be an odd number of dishes.)

We only had to make the soup and the bracken salad from scratch; we took the recipes from Quick and Easy Korean Cooking for Everyone, a really good basic cookbook with step-by-step illustrations and pictures of all ingredients. Everything else we got at the Korean market or had in the house (also easily purchased).

The soup could really be any light soup. We had thought of doing bean-sprout soup (a traditional hangover cure!), but we've got a surplus of greens from our farm share, so it was more practical to use those.

Greens Soup
  • 1 cup frozen greens
  • 2 hot green peppers (gochu or jalapeño), sliced into rings
  • ½ green onion, sliced diagonally
  • 3½ cups dashima (seaweed) stock or chicken stock
  • 4 oz doenjang (miso)
  • crushed garlic, to taste (i.e. lots)
  1. Defrost greens, squeeze, and drain thoroughly.  Cut into 2" pieces.
  2. Bring stock to a boil.  Reduce heat, add greens and cook 3-4 minutes.
  3. Dissolve doenjang in stock, add garlic, and return to boil.
  4. Stir in peppers and green onion, remove from heat, and serve.
We have an excellent automatic rice cooker, all you need to do is put in washed rice and press the button. We added a few tablespoons of black rice which makes the whole pot a pretty purple color once cooked.

Our kimchi we did make ourselves, although somewhat nontraditionally using a recipe for Pickled Kimchi from the Complete Book of Picking. Real kimchi is not pickled, but if you've ever kept kimchi for an extended period of time in your regular refrigerator, you will appreciate the utility of being able to keep it vacuum-sealed in the pantry until needed! On the other hand, if you do purchase your kimchi, avoid the commercially jarred stuff; I have yet to find any brand that is very good. Hopefully your market will have house-made kimchi with the prepared food, and this will be much better and more authentic in taste.

Anyway, the kimchi was already done and in the pantry, so the only other things we had to cook were the bracken and the eggs. A fried egg is basically a fried egg anywhere (also makes a good dinner side dish and tasty hamburger topping). The salad could be any simple dressed vegetable—spinach, sprouts, whatever—but we had the bracken left over from something else so we used that.

Bracken Salad
  • 7 oz gosari (bracken), packaged/precooked type
  • 1 tbsp sesame oil
  • 2 tsp crushed garlic
  • 2 tbsp soy sauce
  • 1 tbsp minced green onion
  • 2 tsp cheongju (mirin)
  • 2 tsp rice vinegar
  • 1 tsp ground sesame seeds
  1. Rinse and drain bracken.
  2. Heat sesame oil in a large pan, add garlic and bracken, stir-fry until heated through.
  3. Add soy sauce, green onion, cheongju, and vinegar, continue cooking until sauce is thickened.
  4. Top with sesame seeds and serve warm or chilled.
Finally, we did make one concession to modern Korean prepackaged junk-foodiness with a bottle of Morning Rice, a sweetened rice milk drink. You can buy dozens of different energy/meal-replacement/probiotic/vitamin/diet/etc/etc drinks at any cornershop; most of them are kind of vile, but Morning Rice is pretty inoffensive (actually I think Whit really liked it) and it says "Morning" right on the bottle!

Sunday, October 3, 2010

South Africa - Maize Porridge with Fruit Compote


Background
South Africa is a very diverse country, and it cuisine reflects this. In addition to the numerous tribes that go back to the origins of humans, one also finds the influence of Dutch colonists, exiled French Huguenots, the British, Indians, and Malaysians. (I was unaware of the Malaysian influence prior to doing this research. They were brought as slave labor by the Dutch in the 17th century and have maintained a distinct tradition.)
Reflecting this diversity we had a large number of distinct options. The option we found first and most often is basically the full English breakfast with a regional sausage called Boerevors. Since we had recently had a full English breakfast we decided to do a little more exploring.
This sent us on a quest to find some good cookbooks. The first book were found was South African Indigenous Foods, which is a collection of recipes collected from across the country to help people make better use of local food resources. It is not very descriptive in terms of background or uses because it is written for natives. It is probably the most rawly authentic cookbook we have found so far in our project.
The books that provided our background were Rainbow Cuisine and A Taste of South Africa. A Taste of South Africa was very authentic calling for ostrich, sorghum, and springbok (a species of gazelle). Rainbow Cuisine provided the most detailed over view of breakfast and the recipes we used.
Given the broad diversity, it was difficult to find a definitively South African breakfast. We decided to sample from both the African and European influences in the cuisine, and chose to make a dried fruit compote and a maize-meal porridge.


Compote of Dried Fruit
  • 250 ml fresh squeezed orange juice, about 4 navel oranges
  • 125 g of dried fruit
  • juice and zest of ¼ lemon
  • ¾ tsp brown sugar
  • ½ cinnamon stick
  • 1 whole clove
  1. Combine all ingredients in a sauce pan.
  2. Cover and simmer for 5 minutes.
  3. Remove from heat and leave it alone for several hours while the fruit absorbs the juice.
  4. Chill in the refrigerator until ready to serve (keeps up to 5 days).

Maize Porridge
The maize meal used in South Africa is a white meal, and the easiest equivalent found is hominy grits.
  • 375 ml water
  • 125 ml hominy grits
  • ¼ tsp salt
  • ½ tbsp butter
  1. Mix grits, 125 ml water, and salt.
  2. Boil the rest of the water.
  3. Gradually stir in the grits-water mixture.
  4. Reduce the heat and simmer for 15 minutes.
  5. Mix in the butter.
  6. Serve with milk and honey.
Results and Discussion
This breakfast was simple and nice. The fruit compote is nicely sweet and smooth. It provided a nice counter point to the texture of the warm grits. It felt a bit more like a weekday breakfast than a weekend breakfast but it was very nice and it reflected more of an African influence than European.
We will be away next week but we will provide a history of the Schlesinger Library which frequently provides cookbooks for our more obscure countries.

Sunday, September 26, 2010

Italy - Caffè e Sfogliatelle


Background
Finding Italian breakfast was very interesting. In America, Italian cuisine is heavily influenced by immigrants adapting to local custom and available ingredients. A book that exemplifies this fusion is Buongiorno! by Norman Koplas. It has some great looking recipes in it but they are ideas in Italian cuisine adapted to breakfast with a few authentic dishes mixed in here and there.

This blog post discusses the difference between the two countries. Her assertion is that Italians mostly eat grains, breads, and, cakes in the morning and that meat is for the evening. This clue started us looking books of Italian baking and desserts. We found two fantastic books in The Southern Italian Table and Desserts and Sweet Snacks: Rustic Italian Style. Both of these volumes have some excellent recipes. The Southern Italian Table provided provided confirmation of these assertion and offered a long list of breakfast treats. The author provided us with the information that most Italians buy these from bakeries.

Our first stop was Sessa's, an Italian deli in Davis Square.  Not being a bakery, they did not have exactly what we were looking for, though they are well-stocked in other Italian foodstuffs.  The next idea was to try Modern Pastry up in Medford Square. Kitty had forgotten her forgot bus pass, so we decided to walk over. Serendipitously we passed Lyndell's Bakery during our wander and went inside. We were lucky enough to find and recognize sfogliatelle, aka lobster tails, a specialty of Naples recommended by our book.

The next quest was for the appropriate coffee. We decided on two drinks that are almost ying and yang to one another: caffellatte and latte macchiato. Caffellatte is milk added to espresso and latte macchiato is espresso added to milk that is foamed on top.  To make both, we used our brand-new Moka pot, and about 1 cup of milk frothed by the mason-jar method.  For the caffellatte, just pour one demitasse of coffee, then one of milk (save the foam for the macchiato).  The latte macchiato is a little more involved: pour the rest of the milk and foam into glass, and then gently pour in, over the back of a spoon, about ½ demitasse of coffee, which should settle between the milk and the foam.

Results and Discussion
The sfogliatelle was great. The custard filled center is surrounded by a bready pastry. This pastry is then surrounded by a thin flaky pastry wrapped around in single stands that pull off the pastry in a continuous spiral. It was quite fun to pull off and I would have had someone hold one end and run across the room to watch it unwind, but I was told this was not allowed. I would like to try making these from scratch because they are tasty and showy.

The Moka pot makes a nice strong coffee, good for espresso drinks without needing all the complicated machinery.  The latte macchiato was very nice. I like coffee flavor but I find espresso overpowering. Blending the espresso with mostly milk cuts the strength and leaves the flavor. The presentation also looks complicated and this will impress your guests.

Saturday, September 4, 2010

United Kingdom - Full English Breakfast


Background
The full English breakfast is a well-known meal, so our research was a simple Google search. The BBC Food site provided an excellent menu and a preferred sequencing of ingredients to best use the grease produced by the sausage and bacon. The basics of the English breakfast are sausage, bacon, baked beans in tomato sauce, browned mushrooms, toast, tomatoes, a fried egg, and black pudding. Naturally, you serve the breakfast with tea.

One element of the English breakfast we omitted was the black pudding (a type of blood sausage) mostly because it was by far the most difficult item to procure, and we already had enough meat for two people. Kitty has also eaten plenty of tasty blood sausages in Asia and feels that we were not shirking our duties by skipping over it here.  Should you also be unable to find black pudding, these other blood sausages are available at Asian markets; the idea being similar though the taste rather different.

(In U.K. English, the word pudding also describes a bready or milk-based dessert. I became interested in how the same word came to describe two very different dishes. Fortunately the country that posed this etymological challenge also created the solution in the Oxford English Dictionary. The word's first appearance in Latin is in the context of sausage in 1287. The first time it describes a dessert is in 1543. The shared use of the word comes from both dishes being cooked in water while encased in something.)

Recipe
Please see the BBC Food site for the recipe.

Results and Discussion
“Full” is a very accurate modifier for English breakfast. I was not really hungry again until dinner. It also covers a full range of flavors and textures. You have have the savory, dense, and flavorful sausages with the golden casing giving them a wonderful snap. We got these at Savenor's in Cambridge and they were spectacular and reasonably priced. The sweet fresh and moist tomatoes have an excellent contrast of being warm on the surface but still a little cool in the middle; the mushy beans and lightly crunchy toast provide a nice contrast
The sequencing of the elements and grease management are also important for getting the right results. Under optimal condition one would have a griddle and some slightly fattier bacon so we could spread the grease around and have more things cooking at the same time. The bacon we chose was much too lean and as a consequence we had to supplement with a lot of olive oil. The single pan approach does help cut down on dishes which is very nice.
This breakfast is very similar to the southern breakfast I learned growing up watching my grandfather. It is exactly what he would make minus the beans and mushrooms. He also taught me the importance of good grease management.
We will be making its counterpart, the full Irish breakfast, in about 2 years.

Sunday, August 29, 2010

France - Croissants


Background
Clearly France is a country whose culinary credentials require no introduction. This reputation left us quite surprised when we realized that breakfast was simply bread, jam, and maybe a soft-boiled egg. The two best known bread products of France are the baguette and the croissant. The home recipes we found for the baguette were pretty simple, but as baguette is not really the same without a real baker's oven, we decided to attempt the croissants. A French friend recommended the Bonne Maman preserves, which are available in supermarkets. Our breakfast guest Stacy brought the French-influenced chicory coffee.
For our recipe source we chose Paris Boulangeries-Patisserie by Linda Dannenberg. This book gives the recipes from her favorite bakers all across Paris. The croissant recipe comes from Marcel Haupis, whose shop is on Ile-St-Louis in the middle of the Seine River. My first impression of the recipe was that is was very scary. In total it involves 6+ hours of rising and an intimidating amount of butter. We recommend starting the night before, so you don't have to get up at 3 AM.

Croissants
  • 2 tbsp + 1 tsp of yeast
  • 1/3 cup warm water
  • 3 1/2 cups flour + 1/2 cup corn starch (or 4 cups cake flour, which we didn't have)
  • 1/4 cup sugar
  • 1 tbsp salt
  • 1 cup milk
  • 2 sticks of butter (barely malleable)
  • 1 egg, beaten
Note: This process is long and involved. Read through the entire recipes and make sure you plan ahead. We have included many photos of the process to better illustrate the process.
Combine yeast and warm water. Let it sit for 5 minutes while the yeast activates.
Mix all the remaining ingredients except the egg with a wooden spoon.
Then mix using an electric mixer and a dough hook until you can form it into a ball. Err on the side of under-working the dough.
Knead the dough on a lightly floured surface until the dough is smooth but still soft.
Work the dough into a ball.
Place the dough in a greased bowl and let it rise for 1 hour. Then refrigerate the dough for 30 minutes.
Roll out the dough until it is 9 x 15 inches and 3/8 inch thick and let  rest for 5 minutes.
As the dough is rising take two sticks of butter out to soften.
Put the butter on a piece of wax paper.
The butter should malleable but not too soft.
Work the butter in a square that is 5 x 7 inches and 1/2 inch thick.
Place the butter on the bottom third of the dough.
Fold the top third of dough over the middle third and then fold this over the bottom third like a business letter.
Seal the edges of the dough.
Roll out the dough lengthwise until it is 9x16 inches.
Repeat the folding process and refrigerate the dough for 10 minutes. This completes the second fold.
Repeat this process for a third fold, refrigerate again for 10 minutes.
After a fourth fold, seal the edges dust the surface with flour.
Wrap in plastic and refrigerate over night.
(This folding process creates layers of butter that help to create the pockets and flakes in the croissant. See if you can calculate how many layers of butter this will create.)
The next morning unwrap the dough and let it rest for a few minutes at room temperature.
Roll the dough into a rectangle 12 x 30 inches.
Cut the dough down the middle using a chef's knife.
Square off the edges of the two strips and cut the strips into 5 x 6 inch rectangles.
Then cut along the diagonal starting in the bottom corner and moving up.
Starting at the 5 inch side of the triangle, roll the dough into the appropriate shape with the tip of triangle coming into the middle.
Shape it into a crescent and place onto a dampened cookie sheet. Make sure the tip is under the croissant to keep it from unfolding during baking.
Brush with the egg and let rise for 2 more hours.
20 minutes before you put the croissants in the oven pre-heat it to 400 F.
Put on a final brush of eggs and place in the oven for 10 minutes.
Monitor them as they cook and take them out if they start to burn.
Results
These turned out really well. Really, really well. They smelled great as they cooked and the smell lingered for a long time. They were warm, soft, flaky, and tasted great with the fig preserves. They oozed butter as they cooked so we highly recommend a baking tray with edges.
It felt really awesome that these work. After completing this meal I want to try to bake more things. The book we got this recipes from has lots of other challenges that look great and I want to try.
We should also say that this recipe produces lots croissants. You should bring the leftovers to work to show how much cooler you are because you made croissants from scratch.

The answer is 27.

Saturday, August 21, 2010

Thailand - Kao Tome

Note: Yes, we disappeared last week. We did cook breakfast; scroll down to see that post as well.


Background
This week's menu had two excellent sources. A friend from Thailand gave us lots of recommendations. Her first recommendation was pah-tong-goh which is a version of donuts. I found some good recipes and many different spellings of this dish. The logistics of the day meant we did not have enough time to make them. It also seems to be a street food so it may not be something that Thai people make at home. Either way, I want to make this at some point in the future.
The other recommendation she made was kao tome which is a rice porridge. I was hesitant to try rice porridge again given how the cháo bò turned out. I started looking for recipes because it would provide a chance to compare the different approaches to the same dish. I came across the book Real Thai by Nancie McDermott which had a recipe that looked good. According to McDermott, Thai cuisine reflects its geography as it rests between Indian and Chinese cuisine.

Chili-Vinegar Sauce (Prik Dong Nahm Som)
Combine the following ingredients the night before and refrigerate.
  • 1/2 cup white vinegar
  • 1 tbsp fish sauce
  • 10 hot chilis thinly sliced crosswise

Fried Garlic (Gratiem Jiow)
Make the night before
  • 1/4 vegetable oil
  • 2 tbsp minced garlic
Important Note: This entire process should not take more than 3 minutes. Otherwise you will burn the garlic as I have done in the past.  Also do not use canned pre-minced garlic as the high moisture content will affect the results.
  1. Heat oil in a skillet over low heat.
  2. Test the oil by dropping in a piece of garlic. The oil is ready if it sizzles immediately.
  3. Add the rest of the garlic and cook until it starts to turn golden.
  4. When the color change starts remove the garlic from heat.
  5. The garlic will finish cooking in the hot oil.

Kao Tome
  • 4 cups chicken stock
  • 2 cups of cooked jasmine rice
  • 1/4 lb minced pork
  • 1 tbsp fish sauce
  • 1/4 cup fried garlic
  • 3 tbsp green onion cross sliced
  • 1 handful of cilantro
  • Chili-Vinegar Sauce
  1. Bring stock to a boil and stir in the rice.
  2. When the water starts to boil, add the minced pork and cook until the pork is done, about 5 minutes
  3. Stir in fish sauce and pepper.
  4. Remove from heat.
  5. Garnish with fried garlic, green onion, chili-vinegar sauce, and cilantro leaves.
  6. Add chili-vinegar sauce and fish sauce to taste.

Results and Discussion
Thai rice porridge was better than our Vietnamese rice porridge. The first major improvement was making the rice the night before and cutting an hour off the prep time. This version also had a much better taste and was lighter because we had a leaner meat. The chili-vinegar adds a nice accent that brings out the other flavors in the meal. The fried garlic is a nice enhancer as it gives little crispness at a couple of points. If I were to retry the cháo bò I would cook the rice the night before and start from there and save a lot of time. I also have lots of leftover chili vinegar sauce and I will have to find a way to use it up. I could see it working as a salad dressing with a couple of additions.

Sunday, August 15, 2010

Iran - Khiyar with Kateh


Background
Information on Iranian breakfast was much easier to find than last week's country. The books Treasury of Persian Cuisine and A Taste of Persia provided excellent information and a variety of choices.
Archeology of Persian cooking goes back to 2000 BCE and a cookbook from the 1200s is known to exist. The 13th century cookbook focuses on combinations of sweet tasting meets with different syrups and fruits. Rice is mentioned in this text but it is not yet given any special attention. Treasury of Persian Cuisine provides an interesting aside on how Persian cuisine in the 17th century was based around balancing the humors with foods that fall into the categories of hot, cold, wet, and dry. Hot and cold foods refer to the food's energy content. The book did not mention what was meant by wet and dry.
Our options for this meal were plentiful. One was a soup with bulgur wheat and lamb called haleem, and it is served during Ramadan which has just started.  But it also takes 2-3 hours to make. The next entree I came across was khiyar which is cucumbers with feta or honey that is eaten during the spring. We have some nice cucumbers from our farm share so we decided to make this.
For our carb we had to choose between nan-e barbari and kateh. Nan-e barbari is a baked flat bread. Kateh is a rice dish where the rice is baked into a cake shape. The bread is traditionally eaten with the khiyar, but I chose the kateh because we have had flatbreads with previous breakfasts and this dish was a new challenge.

Kateh
  • 2 cups jasmine rice
  • 3 1/2 cups water
  • 2 tsp salt
  • 1/3 cup ghee
  1. Wash the rice.
  2. Combine water, rice, and salt and bring it to a boil on high heat.
  3. Simmer on medium until all the water absorbed and stir to prevent rice from sticking.
  4. Stir in ghee
  5. Cover pan with a paper towel to absorb condensation and place the lid on top to secure it.
  6. Cook for 30 minutes at low heat.
  7. Invert rice onto a platter and serve as a golden cake
Khiyar
  • Sliced cucumber with feta crumbled on top drizzled in honey

Results and Discussion
The khiyar was simple, quick, and tasty. The flavors go together really well and are nice on a warm summer morning. The cucumbers were very moist and this goes well with the dryness of the feta. The honey's sweetness compliments the feta's salty taste.
The kateh could have come out better. The basic taste was very simple and nice. (Ghee makes things taste good.) The major issue in preparation was probably not getting the ghee distributed evenly into the pan and along the sides. As a result the golden brown shell was left on the side of the pan. Looking online I found advice that I should use a non-stick pan. Follow this advice. I also think that melting the ghee before mixing it into the rice would also help to ensure a better distribution and hopefully lead to less sticking.

Sunday, August 8, 2010

Democratic Republic of the Congo - Saka-Saka


Background
The background research for this breakfast was very difficult but had an elegant solution in the end. Cookbooks about the Democratic Republic of Congo or Zaire were not easily found. The next step on our search was to find cuisine of the dominant ethnic group of the country. This ethnic group is the Bantu and they are widespread through out sub-Saharan Africa. As a result I found a very comprehensive site about Somali Bantu which I stashed away for future reference.
The elegant solution came via my mother who reminded me that a good friend had lived near the DRC border studying gorillas for a year. I phoned Ayres and he recommended saka-saka. The recipe is from an African recipe site called The Congo Cookbook. I had come a across it before but I was unaware it was eaten for breakfast. In Africa the leaf would be a cassava leaf and would freshly picked form the plant. We chose to use collard greens as recommended by the website. We served the saka-saka on jasmine rice.

Saka-Saka
  • 1 bunch of collard greens
  • 2 tbsp peanut oil
  • 1 onion chopped
  • 1 clove garlic minced
  • 1 bell pepper chopped
  • 1/2 lb chopped okra
  • can of sardines
  • salt to taste

  1. Tear the leaves into pieces and throw out the stemmy parts of the leaf.
  2. Soften the leaves with a rolling pin.
  3. Bring 4 cups of water to a boil, add the leaves, and simmer for 30 minutes uncovered.
  4. Add the remaining ingredients to the pot and cook down the water.
  5. Serve on a bed of jasmine rice.
Results and Discussion
This breakfast was simple once the research was done. The major mistake we made was buying a fresh packing of sardines. They had very little salt in them and so the final dish was a little bland. This problem was quickly remedied with a salt shaker. Another problem that I added far to much water at the beginning and it took a long time to cook off. The 4 cups given in the recipe is my guess at what should be an appropriate amount of water to cook the greens and have the breakfast ready in a timely fashion.
An alternative method of mashing the leaves involves a bowl, a bottle, and bashing. We chose the rolling pin method because we live in an apartment and bashing the leaves early in the morning would be rude to the neighbors. It does sound much more fun than a rolling so somebody try it and let us know.