Sunday, January 30, 2011

Iraq - Tasbreeb Bigilla


Background
Finding information on Iraqi breakfast was actually very simple. I found an article online about breakfast before the 1990 Gulf War and the subsequent embargo. It provided a fantastic list of recipes.
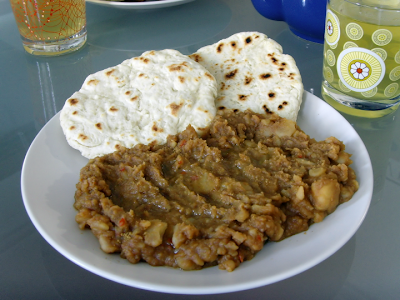
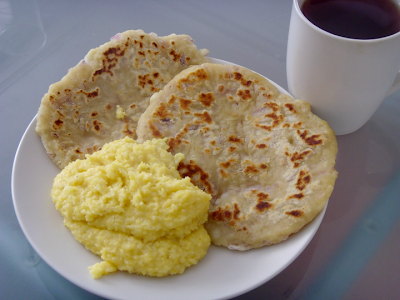
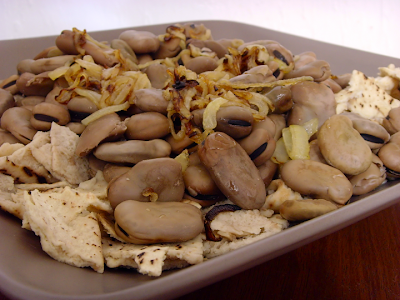
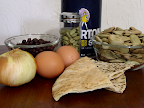
As Iraq is probably the first place wheat was domesticated, it comes as no surprise that bread is a staple of the diet. Other ideas included gaymer, a buffalo cheese sometimes served with date syrup, and kahi, a dish brought to Iraq with Babylonian Jews. It is very closely related to baklava and requires many folded layers of pastry dough. Bigilla is a fava bean dish eaten in northern and central Iraq. I located a variation of this dish called tasbreeb bigilla in The Iraqi Cookbook. It consists of fava beans served with pita bread topped with fried onion and peppermint powder, and is traditionally served on Fridays. We were unable to find peppermint powder specifically so we used crushed dried mint.

Tasbreeb Bigilla
  • 1 lb fava beans
  • 1 packet of pita bread (ours had six pitas)
  • 1 medium onion, thinly sliced
  • Olive oil
  • Salt
  • Dry mint
  1. Soak fava beans overnight in cold water.
  2. Cut pita bread into pieces and leave them out overnight so they dry out. (Alternatively, put the bread pieces in an oven at 200 for 30 minutes.)
  3. Bring the beans and water to a boil at medium heat, and boil them for 45 minutes.
  4. Add salt and continue to boil for 15 minutes. Make sure there is enough liquid remaining to soak the bread.
  5. While the beans are cooking, heat oil in a pan, add the onions to the hot oil and fry them until browned.
  6. Remove the cooked beans from the water.
  7. Soak the bread pieces in the bean liquid for 1 minute. Then remove them from the water and place them in a big shallow bowl.
  8. Put the beans on top of the bread and then pour the onions and hot oil over the beans.
  9. Sprinkle the dry mint to taste over your plate.
Results and Discussion
This recipes makes a lot of food. We could have easily halved it and still had lots of food. It was suggested to serve this with fried eggs, but we had to leave them out or we would have been eating the leftovers all week!
The pita bread pieces had an interesting texture. Being soaked in the bean juice infused them with flavor. Getting the bread pieces in and out quickly lets the flavor soak in while preventing the bread from becoming soggy.
The fried onions in the oil added lots of taste and the next time I make this I am going to add more onions. The oil itself provides the same flavor enhancement and texture contrast as in the previous breakfast.
In Iraq they add cardamom to the coffee for flavor, which is probably quite good when done properly. We were not paying attention and completely screwed this up—getting the ratio of water to coffee wrong and ending up with a very weak brew. We're now on an 0-for-2 beverage streak, and will have to pay more attention from now on!

Sunday, January 23, 2011

Morocco - Beyssara


Background
Moroccan cuisine reflects its multiple interactions with different culture through trade and conquest. It is in the Mediterranean tradition. The Berbers brought influences from just west of Egypt (their best known contribution is couscous). The Moors conquered Spain and Spanish influence flowed back across the straight of Gibraltar.
We found lots of different options for breakfast. Lassida is a porridge made of semolina or couscous and flavored with honey and butter. But it is traditionally eaten to break the fast during Ramadan, which has long since past. Baghrirs are a pancake made with semolina and only cooked on one side. The batter has the consistency of a crepe. Beyssara is a spiced fava bean stew served with bread. We found a recipe for this in Mediterranean Street Food which looked simple and tasty, and so decided to make the beyssara.
The national drink is green tea with mint. Making it is considered an art and has ritual associated with it. We had some trouble with the mint tea. Though we did have an errand at the Burlington Mall yesterday and would have bought some at Teavana, it took us 40 minutes (!) to get into and out of the parking lot and so we ran out of Zipcar time. The grocery store was also out of mint of any kind, so we made regular green tea.
The one difficulty in making beyssara was finding split, peeled fava beans. The best option available were a pickled peeled bean and I did not know how they would effect the test. I give a method of peeling the beans in the recipe.

To peel dried fava beans
  • 1 cup dried fava bean
  • 3 cups water
  • 1 tbsp oil
  1. Put fava beans, water, and oil into a pressure cooker.
  2. Cook at high pressure for 15 minutes.
  3. Quick-release the pressure.
  4. Open the pressure cooker, tilting the lid to that the steam is released away from you.
  5. Drain the beans and put them into a ice water bath. Let them sit for 20 minutes.
  6. The skin around the bean should now be loose and can be removed using your finger nails or started with a paring knife.
  7. Discard the skin and keep the bean. Split the beans if you can.
  8. Refrigerate the beans until you use them.
Beyssara
  • 1 cup peeled split broad beans, soaked overnight in hot water with 1 tsp baking soda
  • 2 gloves garlic, unpeeled
  • 1½ tsp ground cumin
  • ½ tsp red pepper flakes
  • 1½ tsp paprika
  • Salt
  • Extra virgin olive oil
  1. Put the beans in a sauce pan with the garlic, cumin, red pepper flakes, and 1 quart of water.
  2. Bring to a boil on medium high heat.
  3. Cover the pan and cook for 30 minutes or until they are mush.
  4. Reduce the heat to low and simmer for 10 to 15 minutes.
  5. Add the paprika and salt to taste.
  6. Serve in a shallow bowl and garnish with a drizzle of olive oil and cumin.
  7. Eat with Moroccan bread.
Results and Discussion
This recipe takes a while, but that is in the nature of cooking dried beans. The cooking time could also be reduced by cooking them longer in the pressure cooker. Most of the water boils off or is absorbed by the beans, but you can easily control how moist the beans are by adjusting the cooking time. The end result is nicely spiced with an enjoyable rough texture. I think ours was a bit drier than it was supposed to be as we ended up with more of a paste than a soup but it still pretty good.
The drizzle of olive oil added a nice flavor. It also provided a strong contrast of textures with the beans.

Sunday, January 16, 2011

Uganda - Ugali and Chapati


Background
Ugandan cuisine has an East African base, modified by the influence of the conquering Arabs and English. The biggest influence the English brought to our breakfast was really Indian influence. I always had a scope of the British Empire in my mind but I never realized how much influence the Indian citizens of the Empire had as they migrated out.
The biggest problem searching for information on Ugandan breakfast is that President Obama made an appearance at a prayer breakfast about Uganda's proposed anti-homosexual laws. This made it impossible to search by "Ugandan breakfast" and we had to get more creative with our query.
We found that Ugandan breakfast consists of ugali and chapati. It is basically the same as Tanzania. I was unable to find a Ugandan cookbook so I used online resources to try and find recipes specific to Uganda. The ugali recipe can be found here and the chapati recipe we used is here. The chapati recipe is a little free form our more detailed interpretation is follows.

Chapati
  • 2 cups flour
  • 1 tsp salt
  • 2 cloves garlic, minced
  • 1/4 red onion, finely diced
  • 1/2 cup warm water
  • oil for frying
  1. Mix dry ingredients, onion, and garlic in a bowl.
  2. Slowly add the warm water (I would start with 1/4 cup) and mix it into a doughy consistency.
  3. Add more water as needed—the onions and garlic are going to contribute some moisture to the dough, so add the water slowly.
  4. Knead until you have a tough doughy consistency.
  5. Let the dough rest for 30 minutes.
  6. Break the dough into tangerine-sized balls, then roll the dough into pancakes 6 inches in diameter. (Put flour in between the chapatis when stacking them to prevent sticking.)
  7. Heat a frying pan and spray a thin layer of oil into the pan.
  8. Fry one side of the chapati until it starts to brown, then apply oil to the uncooked side of the chapati, flip it, and cook the other side.
Serve with the ugali on top of the chapati

Results and Discussion
This breakfast was very filling and pretty easy. The only really involved part was constantly stirring the ugali while it cooked. I am not a big fan of ugali. The first taste is really nice; it has a good salty taste and is a little creamy. As I eat more of it it just becomes bland and thick. For Tanzania I thought it might have been undercooked, but I know that was not the case here. Ugali is food for quick energy and not for taste.
The chapatis were very dense and chewy. The red onion and garlic were nice additions and added some subtle flavors. I would like to try it cooking the onions and garlic prior to putting them in to the dough to enhance this.

Sunday, January 2, 2011

Canada - Sourdough Hotcakes


Background
When I started looking up information on Canadian food, I basically thought it would be English cuisine, with French influence in Quebec. I got The Canadian Cookbook from the library. As I was reading through the recipes I started to realize that this basic assumption was true but that the cuisine has also been influenced by everyone who showed up in the country (a lot like the United States in that regard). The book also had an excellent section on breakfast foods giving a wde number of choices.
Our choices ranged from yam latkes, french toast, bannock, crepes, and sourdough hotcakes. The only dish from this I had not previously heard of were bannocks. Bannock is a quick bread brought over from Scotland and was a staple of early settles and fur traders. However, we decided to make the sourdough hotcakes. First because I never made sourdough before and I have heard people rave about how wonderful it tastes. The second reason is that I have not had pancakes in while and I really miss it.
The book gives two methods of making the starter. We chose the overnight version instead of the weeklong version, mostly because we were cooking dinner for 10 people over New Year's and had no spare mixing bowls. We will list both methods.

Sourdough Hotcakes
  • 2 cups sourdough starter (recipes follow)
  • 1½ cups unbleached or wholewheat flour
  • 2 tbsp sugar, maple syrup, or honey
  • 3 tbsp oil
  • 2 eggs
  • ½ tsp salt
  • 1 tsp baking powder
  • 1 tsp baking soda, dissolved in 1 tbsp of warm water
  1. Preheat and grease the griddle.
  2. Mix all the ingredients together except the baking soda.
  3. Gently fold in the baking soda and start cooking immediately as to not lose the leavening effect.
  4. Place a spoonful of batter on a hot griddle and shake it to get a circle like shape.
  5. Cook, turning once, until golden brown on each side and done in the middle.
Fast Sourdough Starter
  • 1 cup warm water (100–110°F)
  • 1 cup unbleached flour
  • ½ tsp active dry yeast
  1. Mix all of the ingredients in a bowl.
  2. Leave it out on the countertop overnight in a draft-free area. The optimal temperature is somewhere between 65–77°F.
  3. If you want to let the starter develop a stronger taste or keep it for future use you can let it strengthen over several days. Give the starter ¼ cup flour and ½ cup water every other day.
Old-fashoned Sourdough Starter
  • 2 large potatoes (unpeeled)
  • 3 tbsp sugar
  • 1 2/3 cups flour
  • ½ tsp active dry yeast
  1. Boil the potatoes until they fall apart.
  2. Remove the potato skins and mash them in a non-metallic bowl.
  3. Add water as needed to make a thick liquid.
  4. Add the remaining ingredients and beat the mixture smooth.
  5. Let starter stand for a week before use and feed as described above. 
Results and Discussion
Making the starter is very easy and it starts making bubbles and expanding after about 30 minutes. The sour taste was not as well developed as I had hoped and I would make the starter several days in advance next time. The batter was very thick and this makes pouring them very difficult. I checked the recipe several times to see if more liquid was needed but it was right. Shaking the pan has I poured helped a little and the results were mostly round. You are going to want to cook these on each side longer than normal pancakes because they are really thick. A stack of six was almost 6 inches tall. This thickness resulted in an under done center in a few of the pancakes.
In the end they were a beefed-up version of normal pancakes only much thicker and with a slight sourness. When paired with the maple syrup you get a nice sweet-and-sour pairing. Giving the starter a couple more days would have made this better.
It felt very good to make pancakes again. Pancakes have been a staple of my Saturday and Sunday breakfasts since I can remember. It is probably the first thing I cooked on my own. When I was little I always used Bisquick mixed in an olive green bowl with a white interior. I would mix it with the electric beater and cook it on a griddle that let me cook four at a time. When I got low on batter and I would pour all the batter into one huge pancake to see if could flip it. Results tended to be mixed. I probably left the dishes for one of my parents to clean.