Monday, April 25, 2011

North Korea - We have No Idea, so here is some Breakfast Sausage instead

How hard do you think it is to research food habits in North Korea?
Answer: very hard. There is not much at all in English, and though Kitty's Korean skills are nowhere near up to this task, there didn't seem to be much useful information in that language either. What little information we could find suggested that it was either very similar to the South Korean breakfast, or nothing at all (probably much dependent on whether you are in the army or an otherwised privileged member of society).
In light of our research fail, we present instead a sample of Whit's other food project, sausage-making. Kim Jong-il probably has sausage for breakfast every day anyway...


Breakfast Sausage with Sage and Ginger
The following is an overview of the sausage making intended to make the process less intimidating with the hope that the reader will be inspired to give it a go. For an amazing book on sausage making and other meat-related topics with much more detail get Charcuterie by Michael Ruhlman and Brian Polcyn.

Tools
  • Meat grinder or grinder attachment for a stand mixer
  • Meat funnels
  • Ruler
  • Kitchen scale
Ingredients
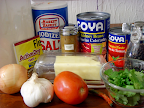
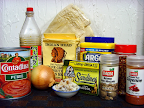
  • 5 lbs boneless pork shoulder, diced
  • 40g kosher salt
  • 50g peeled ginger, finely chopped (or 8g ground dried ginger)
  • 18g minced ginger
  • 6g black or white pepper
  • 1 cup chilled water
  • 10 ft hog casings
Preparation
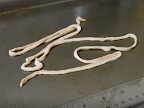
Soak the hog casings in room-temperature water for at least 30 minutes prior to stuffing. Place your grinder and any bowls you plan on using in the refrigerator or freezer prior to starting. Keeping the ingredients cool prevents the fat and meat from separating and improves the texture.

Grinding
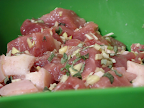
Mix all the ingredients into a cold bowl, excluding the water. Grind the mixture using the fine grind/small die plate into chilled bowl.

The Primary Bind
This step makes the ground meat stick together and ensures a more uniform texture.  Add the water and mix well for 1 minute. The paddle attachment and the metal bowl of a Kitchen Aid mixer are excellent for this step. Place the bound mixture back into the refrigerator until it is needed.

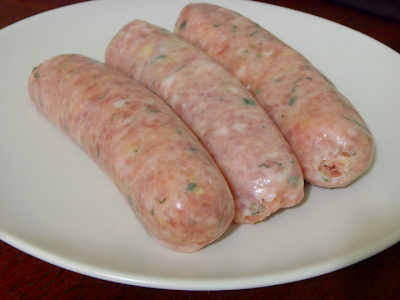
Stuffing the Sausages
  1. Put the bound sausage filling into the stuffing machine or back into the grinder.
  2. Fill the casing (use any leftover fillings to make patties)
  3. Twist the casing into links of the desired length
  4. Roast or saute the sausages (wrap any uncooked sausages in freezer paper and save them for later or give them away to friends in order to be showy)
Discussion
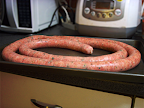
Homemade sausage differs greatly from what is found in most grocery stores. The texture and flavor are amazing. There is a freshness one is not accustomed to in most sausages. The natural casings have an excellent snap and aroma as they brown on the outside.
The start up costs of making sausages are not too bad. The Kitchen Aid grinding and stuffing attachments are less then $100 and the grinder has uses beyond sausage making. However, stuffing with the grinder is not optimal. It is slow and you encounter problems with air pockets when loading the grinder. Stuffing machines are rather expensive and only do one thing. (But they do this one thing very well, and I look at pictures of them in catalogs and covet because they are so much faster.)
A video on the process can be found here, and a video of the process starting with an entire pig can be found here.

Monday, April 18, 2011

Yemen - Fasoolia and Malooga


Background
Yemen is located on the southern coast of the Arabian Pennisula, making it a key port in the spice trade. Most sources credit the Ottoman Empire as the only outside influence on the cuisine, but they do not give any specifics. The major protein sources are chicken, lamb, and beans. Dairy is not common in the diet except for ghee.
We didn't have much trouble finding out what dishes are served at breakfast, but finding recipes proved difficult as spellings are not standardized. The only book I found on Yemeni cuisine focused specifically on a small Jewish community in the country. Looking online, there are several recipes available for fasoolia, a bean and tomato dish. It is traditionally eaten with a massive piece of flat bread called malooga. The bread is made by folding semn into the dough. Semn is a darkened ghee and is easily made at home.
It is served with sweet tea flavored with cardamom.

Fasoolia
We went online for our recipes this week. The same fasoolia recipe is found all over the internet and can be found here.
Using the masher did not break up the beans very well and I would use a stick blender in future attempts.

Malooga
The malooga and semn instruction can be found here.
1 stick of butter gives you a little more than 1/3 cup of useful semn while keeping the burned pieces on the bottom.
The recipe made one piece according to the measurements suggested; we did not divide it into smaller parts as directed. When baking the malooga, be sure to use an edged cookie sheet: the semn is very lubricating, and the higher oven temperature may cause your baking sheet to warp and your malooga to slide off!

Results and Discussion
The fasoolia was a really nice dish and comes together very quickly. The combination of cumin, tomato, and cilantro is classic. It is also very warm and filling.
The real treat for this breakfast was the malooga. Most of our previous flat breads are pretty simple and created as almost an after though. The malooga was much more involved than previous flat breads. Not rolling the dough after each fold, and then making a ball leads to the creation of irregular layers. They flake off very nicely for dipping and scooping. The bread keeps well over night. I would like to use this recipe for pizza dough. (I am sure Yemenis do this already and call it something else! –Kitty)

Monday, April 11, 2011

Taiwan - Baozi


Background
Taiwan has only been separate from mainland China for a little over 60 years. It's cuisine is greatly influenced by middle China. Japanese influence is also prevalent as it was a Japanese possession for the first half of the 20th century.
Our research for Taiwan was a little backwards. I started by emailing my former Wing Chun instructor and asked him what he ate when he lived there. His response was you tiao served with hot soy milk. You tiao are deep-fried dough, very similar to a cruller in appearance. Unfortunately they require real deep-frying and we lack the equipment to that as safely as we would like. We then had the idea of dim sum, which seemed to be backed up by the general blogosphere, so we began looking for dim sum dishes specific to Taiwan. This search yielded no results, but we found several general books on dim sum. We decided to use Dim Sum: The Art of the Chinese Tea Lunch for our recipes and techniques about refrigeration and reheating. In the end we decided to make two different styles of steamed buns, known as baozi. The first bun is filled with ground pork, onion, and spinach. The second bun is filled with adzuki bean paste.
Adzuki is our novel ingredient for this breakfast. It is a legume that is grown through out eastern Asia. It is usually sweetened before it is eaten, and canned sweetened adzuki bean paste can be purchased ready-to-use from Asian groceries.
The process of making the bao dough takes at least 2 hours of rising and we determined that length of time to be prohibitive for starting from scratch in the morning. We decided to make and steam the buns the night before and reheat them in the morning.

Monday, April 4, 2011

Ghana - Kenkey


Background
Ghanian cuisine consists of a lot of stews with cassava, yam, and corn as major starches. The protein sources are lots of smoked and dried fish. Spicy condiments are very popular. Ghana has over 100 ethnic groups so a diversity of cuisines is expected.
I found two choices for our breakfast. The first dish option was ampesi, a mixture of boiled starchy vegetables served with boiled onions and fish. The second choice was a dish made of fermented cornmeal called kenkey. I was able to find two recipes for both dishes in A West African Cookbook and A Good Soup Attracts Chairs. My initial leaning was towards the ampesi because the kenkey seemed a little too close to ugali. After getting my hands on the recipes for both, one factor in the kenkey recipe from two different sources jumped at me. The instructions tell you to remove any mold that might have grown on the dough during the fermentation process. This warning was slightly scary. Kitty then reminded me that part of this project was to try the slightly scarier things. We went with the kenkey.
As we did further research online looking into the appropriate sauce to serve with kenkey. Ga Kenkey, also called komi, is eaten in the coastal areas. It is fermented for 2-3 days and steamed in corn husks. The name is taken from the Ga-Adangbe people who inhabit the south east coast. Fanti kenkey is fermented for 5-6 days and is steamed in a plantain leaf. This version takes its name from the Fanti people who live on the southwestern coast. We chose to make ga kenkey because we really did not have enough fermentation time (or ambition) for the other.
Our next step was tracking down a recipe for the a chili sauce called shito. Shito is essentially the ketchup or the barbeque sauce of Ghana. It is made from tomatoes, dried shrimp and fish, oil and chili powder. More of the recipes describe how the fish smell fills the house and one recipe involving a slow cooker recommends doing it all outside. The scale of these recipes were also huge. We decided to make a spicy tomato sauce with onion, chili powder, and fish sauces to approximate shito.
We also chose to use a pressure cooker in order to speed up the cooking time. Traditionally kenkey is steamed and takes 60 to 90 minutes. We based on timing for this on pressure cooker recipes for vegetarian tamales. We include both pressure and steaming directions in the recipe below.

Kenkey
  • 3 cups white stone-ground cornmeal (not de-germinated)
  • 1 tbsp corn starch
  • 3 cups warm water (105-115°F)
  • 1 tsp salt
  • dry corn husks
  1. Put cornmeal and cornstarch into a bowl.
  2. Add the warm water and stir until you get a smooth batter/dough.
  3. Loosely cover the bowl the bowl with a cloth or wax paper and set in a warm out of the way place for 2 days.
  4. When you are ready to use the dough start by scraping off and discarding any mold that might have formed. *see note in discussion
  5. Divide the dough in half.
  6. Bring 2 cups of water to a boil in large sauce pan. Once the water is boiling, add the salt and reduce to medium heat.
  7. Add half the dough to the water and mix it in. Let it cook for 10 minutes and stir to prevent scorching.
  8. Remove the pan from the heat, stir in the remaining dough, and mix thoroughly.
  9. Divide the dough into 3 or 4 large portions and put them onto corn husks.
  10. Shape the dough into balls.
  11. Wrap the corn husk around the ball tying it at the top.
  12. Steam or pressure cook as follows:
    1. Steaming
      1. Pour hot water into a steamer pot and put a rack on top of it.
      2. Put the wrapped kenkey on the rack and bring the water to a boil using high heat.
      3. Reduce to low heat and steam for around 90 minutes.
    2. Pressure Cooking
      1. Put the wrappers into the pressure cooker, elevated on a rack.
      2. Add enough water to the pressure cooker to meet the minimum safe level given by the manufacturer.
      3. Cook for 20 minutes at 15 psi.
      4. Quick release the pressure, then open the pressure cooker so the steam releases way from your face.
  13. Let them cool for ten minutes.
  14. Serve with shito and lightly cooked sardines.
Results and Discussion
A quick summary of this meal is expressed mathematically as Kenkey > Ugali. The fermentation process gives the kenkey its own flavor. The finished kenkey is a large spongy unit very similar to a tamale. Our ersatz shito was a very nice sauce that provides some additional moisture and lots of taste. I see why various websites describe it as the ketchup or BBQ sauce of Ghana.
The fermentation process was pretty interesting to watch. The mixture starts as cornmeal suspended in water. The book described it as a dough after the mixing step. I mixed for several minutes but I never got beyond a runny batter. I covered the batter and put into a cooled oven. That evening I checked on it and saw a water with the cornmeal settled out. I put my hand in the batter and felt that a dough-ish substance had formed below the water. A day later it looked the same. On the morning we made the breakfast I pulled away the cloth and found that a dough had formed. (We didn't get any mold, by the way. Frankly, I would be pretty leery of eating anything soft that had mold on it, mycotoxins can be pretty evil. —Kitty)
I proceeded to divide the dough and found that lots of water was beneath it. I think that the gas released by the fermentation caused the dough beneath the surface to fracture allowing the water to drain to the bottom. A sour smell had started to develop. I though the dough might be too watery as I added it to the boiling water. The dough quickly thickened and the problem went away.
When wrapping the dough we tried a mix of corn husks and aluminum foil. Tying off the corn husks and finding husks large enough were difficult. Wrapping the dough in aluminum foil was really easy. Kenkey was much easier to remove from the husks. In the future we decided that we would go with a double wrap using corn husks on the inside and foil on the outside.